
Introduction to Knitting Techniques
Knitting is an age-old craft that has been passed down through generations. It’s a skill that not only allows you to create beautiful and unique pieces but also provides a sense of accomplishment and relaxation. In this section, we will delve into the fascinating world of knitting techniques, giving you an overview and explaining why it’s essential to master them.
- Overview of knitting techniques
- Importance of mastering knitting techniques
Knitting techniques are the various methods used to create different patterns and designs in a knitted piece. These techniques range from the basic knit and purl stitches to more complex methods like cable knitting, lace knitting, and colorwork. Each technique has its own unique effect and can dramatically change the look and feel of your knitted piece.
Mastering knitting techniques is crucial for several reasons. Firstly, it allows you to create a wide variety of items, from simple scarves and hats to intricate sweaters and blankets. Secondly, it gives you the ability to read and understand knitting patterns, which opens up a whole new world of possibilities for your knitting projects. Lastly, mastering these techniques can provide a deep sense of satisfaction and achievement, enhancing your enjoyment of this wonderful craft.
As we move forward, we will explore more about these techniques, their applications, and how you can master them. Whether you’re a beginner just starting your knitting journey or an experienced knitter looking to expand your skills, there’s always something new to learn in the world of knitting.
Remember, “Knitting is not just about the product, but also the process.” So, let’s embark on this exciting journey together!
Transform Your Knits: The Basics of Blocking
Knitting is an art, and like any other art, it requires a few finishing touches to make your work stand out. One such finishing touch in knitting is ‘blocking’. Let’s dive into the basics of blocking and understand why it is so important.
- What is blocking in knitting?
- Why is blocking important?
Blocking in knitting is a method used to give your knitted items a more professional and finished look. It involves wetting or steaming your knitted piece and then shaping it to the desired dimensions. This process helps to even out the stitches, straighten the edges, and allows the pattern to become more visible. It’s like ironing your clothes; it makes them look neat and tidy.
Blocking is an essential step in knitting for several reasons. Firstly, it helps to correct any irregularities in your knitting. If your piece has curled edges or uneven stitches, blocking can fix these issues. Secondly, it allows your knitted item to reach its correct size and shape. This is especially important for items like sweaters or scarves, where fit and drape are crucial. Lastly, blocking enhances the overall look of your knitted piece, making the patterns more visible and the item more professional-looking.
Think of blocking as the final polish on a newly made piece of furniture. It might look good without it, but with it, it looks great. It’s the same with your knitted items. Blocking can transform your knits from good to great, and it’s a skill worth mastering.
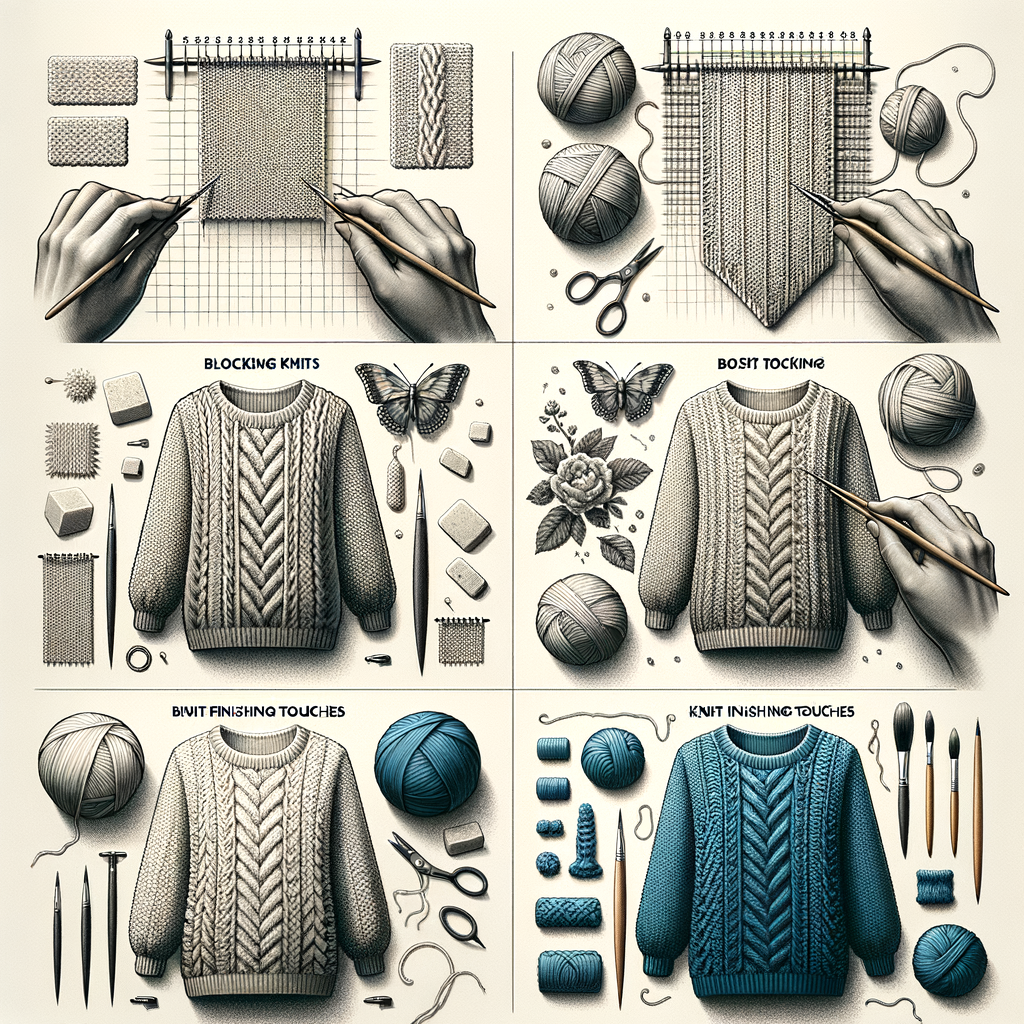
Knitting Transformations: Before and After Blocking
Let’s take a closer look at how blocking can transform your knitted items. We’ll examine two case studies: a knit scarf and a knit sweater.
- Case study: Transforming a knit scarf
- Case study: Enhancing a knit sweater
Imagine a hand-knit scarf, fresh off the needles. It’s beautiful, but the edges are curling, and the stitches look uneven. After soaking it in lukewarm water and gently squeezing out the excess, it’s time for blocking. The scarf is laid out on a blocking mat, the edges are straightened, and pins are used to hold it in place. After drying, the transformation is remarkable. The stitches are now even, and the edges are perfectly straight. Blocking has turned a nice scarf into a stunning one.
Our second case study involves a knit sweater. Before blocking, the sweater might look a bit lumpy, and the pattern doesn’t stand out as it should. After a gentle wash, it’s blocked using a combination of pins and blocking wires to maintain the sweater’s shape. Once dry, the sweater’s transformation is evident. The pattern is now clearly visible, and the sweater has a professional, finished look. Blocking has enhanced the beauty of the knit and made it something to be proud of.
These case studies illustrate the power of blocking in knitting. It’s a simple step, but it can make a world of difference in the final look of your knitted items.
| Knitted Item | Before Blocking | After Blocking |
|---|---|---|
| Scarf | Edges curling, uneven stitches | Straight edges, even stitches |
| Sweater | Lumpy appearance, pattern not clear | Smooth finish, clear pattern |
As you can see, blocking is a crucial step in knitting. It enhances the appearance of your knits and gives them a professional finish. So, the next time you finish a knitting project, remember to block it. You’ll be amazed at the transformation!
Mastering Blocking Basics: Knit Finishing Touches
Knitting is an art, and like any art, it requires a certain level of skill and knowledge to master. One such skill is blocking, a finishing touch that can transform your knits from good to great. Let’s delve into the basics of blocking and learn how to avoid common mistakes.
- Step-by-step guide to blocking
- Firstly, soak your knitted item in lukewarm water for about 15-20 minutes. This helps the fibers relax and prepare for blocking.
- Next, gently squeeze out the excess water. Avoid wringing or twisting your knit as it can distort the shape.
- Spread your knit on a flat, clean surface. Use a towel to absorb any remaining water.
- Now, gently stretch and shape your knit to the desired dimensions. Use rust-proof pins to hold the shape if necessary.
- Finally, let your knit dry completely. This can take anywhere from a few hours to a couple of days, depending on the thickness of your knit and the humidity in your area.
- Common mistakes to avoid
- Not soaking the knit long enough: The fibers need enough time to relax, so don’t rush this step.
- Wringing or twisting the knit: This can distort the shape of your knit. Instead, gently squeeze out the excess water.
- Not allowing the knit to dry completely: If you remove the pins before the knit is fully dry, it can lose its shape. Be patient and wait for it to dry completely.
Blocking is a simple process that involves a few key steps. Here’s a step-by-step guide to help you master this technique:
While blocking is a straightforward process, there are a few common mistakes that beginners often make. Here are some to watch out for:
Mastering the basics of blocking can greatly improve the look and feel of your knits. Remember, practice makes perfect. So, keep practicing these steps and soon, you’ll be blocking like a pro!
Improving Knitwear: Advanced Blocking Techniques
As you continue to refine your knitting skills, you may find yourself seeking advanced techniques to improve the finish of your knitwear. In this section, we will explore two advanced blocking techniques: using blocking wires for lace knits and steam blocking for wool knits. These methods can significantly enhance the appearance and fit of your finished pieces.
- Using Blocking Wires for Lace Knits
- First, weave the blocking wires through the edges of your lace knit piece. Ensure the wires go through every peak and valley of your pattern.
- Next, pin the wires to your blocking board or mat, stretching the lace gently to the desired shape.
- Finally, let your piece dry completely before removing the wires. This will set the shape of your lace knit.
- Steam Blocking for Wool Knits
- First, pin your wool knit piece to a blocking board or mat, shaping it to your desired dimensions.
- Next, hold a steam iron a few inches above your piece. Do not let the iron touch the wool. Press the steam button to release steam onto the knit.
- Finally, let your piece cool and dry completely before removing the pins. This will set the shape of your wool knit.
Blocking wires are a fantastic tool for lace knits. They help to evenly stretch and shape the delicate patterns, creating a professional finish. Here’s how to use them:
Remember, patience is key when working with lace knits. The process might take time, but the end result will be worth it.
Steam blocking is a technique often used for wool knits. The heat from the steam relaxes the wool fibers, allowing the piece to be shaped more easily. Here’s a step-by-step guide:
Steam blocking can transform your wool knits, creating a smoother finish and a more comfortable fit. However, always be careful when working with steam to avoid burns.
Mastering these advanced blocking techniques can take your knitting to the next level. Remember, practice makes perfect. So, don’t be discouraged if your first few attempts don’t turn out as expected. Keep trying, and soon you’ll be blocking like a pro.
Knit Blocking Methods: Tools and Materials
Knit blocking is a crucial step in the knitting process that gives your project its final shape and size. To achieve the best results, you need the right tools and materials. Let’s explore what these are.
Essential Tools for Blocking
- Blocking Mats: These are foam mats where you pin your knits for blocking. They are usually interlocking, allowing you to create the size and shape you need for your project.
- Blocking Pins: These are rust-resistant pins used to hold your knits in place on the blocking mat. They come in different types, including T-pins and fork pins.
- Measuring Tape: This is used to measure your knits to ensure they are blocked to the correct size.
- Blocking Wires: These are long, flexible wires used to give your knits a straight edge. They are particularly useful for large projects like shawls and blankets.
Choosing the Right Materials for Blocking
When it comes to materials for blocking, the most important thing is to use something that won’t harm your knits. Here are some suggestions:
- Water: This is the most common blocking material. Use lukewarm water to soak your knits before pinning them to the blocking mat.
- Mild Soap: This is optional, but a mild soap can help clean your knits and make them smell nice. Make sure it’s a soap designed for delicate fabrics.
- Towels: These are used to remove excess water from your knits after soaking. Use a towel that won’t shed lint on your project.
Remember, the tools and materials you choose can greatly affect the final look of your knits. So, take your time to choose the right ones for your project.
Knitwear Enhancement Techniques: Tips and Tricks
As we delve deeper into the world of knitting, it’s important to remember that the final result of your work depends largely on the techniques you use. Here are some valuable tips and tricks to enhance your knitwear.
- Tip 1: Maintaining even tension
- Tip 2: Using the right blocking pins
One of the most important aspects of knitting is maintaining even tension. This is what determines the size and shape of your stitches. If your tension is too tight, your fabric will be stiff and may curl at the edges. On the other hand, if your tension is too loose, your fabric will be floppy and may not hold its shape well.
To maintain even tension, try to relax your hands as you knit and avoid pulling the yarn too tightly. Practice makes perfect, so don’t be discouraged if you don’t get it right the first time. Remember, the goal is consistency, not speed.
Blocking is a crucial step in finishing your knitwear. It helps to shape your work and gives it a professional finish. One of the key tools for blocking is blocking pins.
Choosing the right blocking pins can make a big difference in the final result. Look for pins that are rust-resistant and have a fine point to avoid splitting the yarn. It’s also a good idea to choose pins with a large head so they’re easy to handle and won’t get lost in your work.
By following these tips and tricks, you can greatly enhance the quality of your knitwear. Happy knitting!
Conclusion: The Stunning Finish of Your Knits
As we reach the end of our journey into the world of knitting and blocking, it’s time to reflect on what we’ve learned and how these techniques can transform your knits into stunning pieces of art. Let’s recap the essentials and see how blocking can make a significant difference in your knitting projects.
- Recap of Blocking Basics
- How Blocking Transforms Your Knits
Blocking is a crucial step in the knitting process that helps shape your knitted items and gives them a professional finish. It involves soaking your knitted piece in water, gently squeezing out the excess water, and then laying it out on a flat surface to dry. The key is to pin the item into the desired shape and let it dry completely. This process helps to even out stitches, improve the drape, and set the final dimensions of your knitted item.
Blocking is like the magic wand that transforms your knits from ordinary to extraordinary. It helps to enhance the beauty of your patterns, making them more visible and defined. It can turn a curled-up piece into a flat and well-shaped item. Blocking is especially beneficial for lace patterns as it opens up the design, making it more intricate and detailed. It’s like the final touch of paint on a masterpiece that brings out its true colors and beauty.
In conclusion, blocking is an essential technique that every knitter should master. It’s the final step that gives your knits a stunning finish, making them look professional and polished. So, the next time you finish a knitting project, don’t skip the blocking process. Embrace it and watch as it transforms your knits into beautiful pieces of art.


