Knitting is a wonderful hobby that has been passed down through generations, offering a creative outlet and infinite possibilities for designing beautiful patterns.
With a seemingly endless array of stitches to choose from, there’s always something new to discover as your skills progress.
As a beginner, it’s important to learn the basics before diving into advanced techniques.
Understanding various types of stitches allows you to build a solid foundation, equipping you with the tools needed to create intricate patterns later on.
Moreover, knowing how different stitches interact will help you achieve your desired texture and appearance when crafting an item.
Key Takeaways
- Mastering the basics is crucial before pursuing advanced stitches
- Different stitches provide various textures and pattern possibilities
- Continuous learning helps expand your creative repertoire in knitting.
Getting Started with Knitting Stitches
As a beginner in the world of knitting, I found it really important to learn about the basic stitches before diving into more complex patterns.
In this paragraph, I’ll share a quick introduction to the essential knitting stitches that can help you on your knitting journey.
The two fundamental stitches in knitting are the knit stitch and the purl stitch. By alternating between these two, you can create a variety of interesting textures in your work.
I think it’s essential to practice these stitches in order to build a good foundation for various knitting projects.
Instructions for Basic Stitches
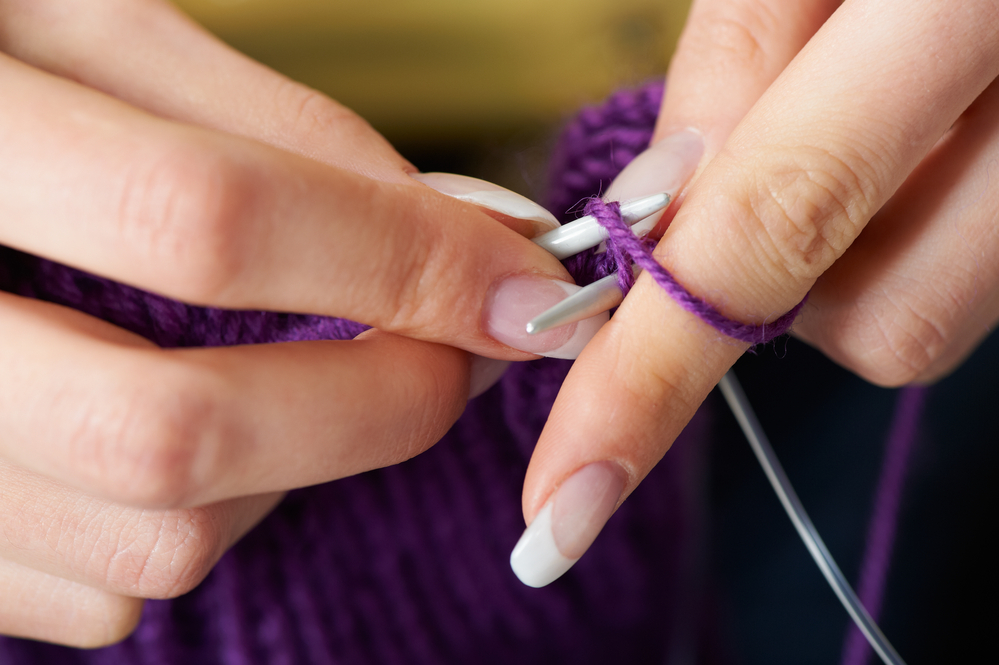
- Knit stitch: To begin, I insert the right needle into the first loop on the left needle from left to right. Next, I wrap the yarn around the right needle counterclockwise and pull it through to create a new loop. Finally, I slide the original loop off the left needle, leaving the new loop on the right needle.
- Purl stitch: Similar to the knit stitch, I start by inserting the right needle into the first loop on the left needle. However, this time it’s from right to left. Then, I wrap the yarn around the right needle clockwise and pull it through to make a new loop. I finish by sliding the original loop off the left needle.
Here’s a table with a summary of the instructions for knit and purl stitches:
| Step | Knit Stitch | Purl Stitch |
| 1 | Insert right needle left-right | Insert right needle right-left |
| 2 | Wrap yarn counterclockwise | Wrap yarn clockwise |
| 3 | Pull through | Pull through |
| 4 | Slide off | Slide off |
Now that I’ve shared some basic instructions for knit and purl stitches, it’s important to practice in order to become more comfortable.
By mastering these two stitches, you’ll be ready to tackle various knitting projects and patterns with ease. Good luck on your knitting journey!
Understanding Knitting Stitches
As a knitting enthusiast, I continuously explore different types of stitches to create unique textures for my textured fabrics.
In this brief section, we’ll look into various knitting stitches and their characteristics.
One of the most basic stitches I’ve encountered is the garter stitch. This stitch is perfect for beginners and creates a simple, uniform texture. To achieve this stitch, simply knit every row.
Another classic favorite is the stockinette stitch, also known as the stocking stitch. To create this stitch, alternate between knitting one row and purling the next.
This results in a smooth side (the “right” side) and a bumpy side (the “wrong” side).
For a more textured look, I often turn to the seed stitch and moss stitch. The seed stitch involves alternating between knitting and purling within a row, while the moss stitch involves knitting the purl stitches and purling the knit stitches for two rows before switching.
The double moss stitch expands on this, swapping stitches every four rows.
For more structured textures, I employ rib stitches like the 1×1 and 2×2 rib stitch.
In 1×1 rib stitch, I alternate between one knit and one purl stitch, while in the 2×2 rib stitch, I work with two knit and two purl stitches. This creates a flexible and elastic fabric.
The linen stitch and slip stitch are also interesting choices for textured fabrics. In the linen stitch, I alternate between knitting one stitch and slipping the next with the yarn in front.
The slip stitch involves slipping the stitches from one needle to the other without working them.
The reverse stockinette stitch is another variation of the stockinette stitch in which I purl every row on the “right” side, resulting in a bumpy texture.
This is a great option for those who prefer purling over knitting.
I love experimenting with complex stitches like the herringbone stitch and star stitch. The herringbone stitch creates a dense, textured fabric with a zig-zag pattern that resembles fish bones, while the star stitch features a series of small, star-like patterns.
Discovering different knitting stitches and their unique characteristics has allowed me to create textured and visually appealing fabrics.
As a knitter, I encourage you to explore these stitches and find your favorites too!
Various Knitting Techniques
I’ve picked up several knitting techniques on my journey, and I’d like to share a few with you. The first one is ribbing – a technique that creates a flexible and textured fabric.
You’ll often see it on the cuffs of sweaters, hats, and socks.
Ribbing is achieved by alternating knit and purl stitches within an even number of stitches.
To create a 1×1 rib pattern, for instance, you would simply knit one stitch, then purl the next, and repeat across the entire row.
To maintain the pattern, make sure you knit the knit stitches and purl the purl stitches on both the right side (the side facing you) and the wrong side (the side facing away) of your work.
Another advanced technique to explore is cabling. This technique involves deliberately twisting or crossing stitches to produce intricate and beautiful designs.
It may seem intimidating, but with a little practice and a cable needle at hand, you’ll be surprised at how easy it can be.
There are a few more knitting techniques that deserve mention:
- Lace: Openwork patterns created by knitting yarn over and decreases.
- Slip-stitch: Patterns that involve slipping one or more stitches without working them, creating a unique texture.
- Mosaic knitting: A colorwork technique that involves knitting with only one color per row, using slip stitches to create intricate geometric patterns.
Remember, practice makes perfect, so don’t be afraid to experiment with new techniques or challenging patterns.
The more you explore, the more you’ll expand your knitting skills and develop your own unique style. Happy knitting!
Common Knitting Stitches for Different Items
When I first started knitting, I quickly realized that there’s a wide variety of stitches to explore.
Different stitches can be used for various items, like scarves, blankets, sweaters, hems, and cuffs.
In this section, I’ll share some common knitting stitches that you can use for these specific items.
For scarves, I find that the basic garter stitch, stockinette stitch, and rib stitch work perfectly.
The garter stitch is created by knitting every row, which results in a simple, textured pattern. The stockinette stitch, on the other hand, alternates between knitting and purling rows, creating a smooth side (the “right” side) and a bumpy side (the “wrong” side).
If you prefer a more textured look, the rib stitch is a great option. It’s achieved by alternating between knit and purl stitches within a row, making it a bit stretchy and perfect for a cozy scarf.
When it comes to blankets, I recommend trying the seed stitch, basketweave stitch, and cable stitch.
The seed stitch delivers a lovely, dense texture and is created by alternately knitting and purling each stitch.
The basketweave stitch mimics the look of woven baskets and can be created by alternating blocks of knit and purl stitches.
If you’re feeling more adventurous, the cable stitch produces a beautiful, twisting pattern – it’s really eye-catching, but it might require some practice!
Sweaters often use a combination of stitches to create unique designs. The raglan stitch, which includes increasing stitches in a diagonal pattern, works well for shaping the sleeves and neckline.
For hems and cuffs, I find that the rib stitch provides enough stretch and a neat, polished look.
In summary, experimenting with different knitting stitches can lead to some amazingly diverse results.
By trying out various stitches for scarves, blankets, and sweaters, you’ll soon find that your knitting repertoire expands, and your finished items will look unique and impressive.
Intricate Stitching Methods
I’ve always loved learning new knitting techniques. Intricate stitch patterns can elevate a simple knitting project into a stunning piece of art.
In this section, I will introduce you to some exciting, intricate stitching methods that I’ve come across in my knitting journey.
Cables are among the most popular intricate stitch methods. They create a beautiful texture and design that can be easily added to scarves, sweaters, and more.
To knit cables, you simply rearrange stitches using a cable needle, then knit and purl as you typically would.
Believe me, once you pick up the basics of cabling, you’ll want to try more complex cable patterns.
Another beautiful method for intricate stitches is Fair Isle knitting. Originating from the Shetland Islands, Fair Isle is a technique where multiple colors are used to create detailed patterns.
While working on a Fair Isle piece, I always make sure to maintain consistent tension to avoid puckering.
It’s also essential to manage the strands of yarn at the back of the work carefully.
Of course, the basis of most knitting patterns includes the classic knit and purl stitches. By simply altering the order in which these stitches are made, you can create an incredibly diverse range of stitch patterns.
Some of my favorite textured stitch patterns include the seed stitch, ribbing, and basket weave.
To create shaping and dimension in your knitting, you may need to use techniques like k2tog (knit two together), ssk (slip, slip, knit), and p2tog (purl two together).
K2tog and p2tog are techniques used to decrease the number of stitches by combining two stitches into one, while ssk creates a neat left-slanting decrease.
It’s amazing how these stitch modifications can change the character of your work!
I hope you find these intricate stitching methods as fascinating and enjoyable as I do. Experimenting with these techniques can truly showcase your creativity and skill.
Give them a try next time you want to challenge yourself and take your knitting to a new level of expertise.
Free Hand Design Patterns
I love exploring free-hand design patterns in my knitting projects. These patterns give me the freedom to create unique and personalized knits that suit my own style and taste.
One of the best things about free-hand design is that I can get creative with my stitches.
There is no need to stick to a fixed pattern, so I can constantly challenge myself and experiment with new stitch combinations.
For example, I might begin by combining standard stockinette and garter stitches for a simple pattern.
Then, I suggest adding more intricate stitches, such as cables or bobbles, to create texture and visual interest.
Tips for mastering free hand design patterns:
- Practice basic knitting stitches until I feel confident enough to begin developing my own patterns.
- Sketch out design ideas in a notebook before starting a project to help with planning and visualization.
- Experiment with different yarn weights and textures to see how they can alter the appearance of a design.
- Keep notes on any unique stitch combinations or patterns I create so that I can refer back to them in the future.
Free-hand design projects can require a bit more focus and patience, but the end result is always worth it.
I find it incredibly rewarding to look at a finished knit and know that I created it entirely from scratch, with all its unique details and characteristics.
It’s a great way to showcase my personal style and even pass down treasured knitted keepsakes to friends and family. Happy knitting!
Learning Stitch Textures and Patterns
I love exploring new knitting patterns and learning about various stitch textures. If you’re interested in leveling up your knitting game, you’re in the right place.
There are so many beautiful patterns out there, and I’m excited to share a few of my favorites with you!
One of the first patterns I learned was the basketweave. It’s a simple stitch that creates a stunning texture resembling a woven basket.
The look is achieved by alternating between knit and purl stitches. This classic pattern is perfect for blankets and scarves and looks great with many types of yarn.
Another fun texture to learn is the bobble stitch. This adorable stitch creates cute little “bubbles” on your fabric.
It’s perfect for adding detailed, three-dimensional designs to your projects. I’ve used it for baby blankets, sweaters, and even accessories like bags and hats.
But my personal favorite has to be the waffle stitch. As the name suggests, it creates a lovely texture similar to a delicious waffle.
I love using this pattern for cozy, textured dishcloths and blankets.
The combination of knit and purl stitches also creates a unique, squishy fabric that is as beautiful as it is functional.
There’s no shortage of interesting and unique stitch patterns to explore.
Some other exciting stitch patterns include the:
- bubble stitch
- broken rib stitch
- hurdle stitch
- bamboo stitch
- diamond pattern
- honeycomb stitch
- diagonal seed stitch
- granite stitch
As well as the more intricate patterns, such as:
- Irish moss stitch
- tiles stitch
- basket loop stitch
- caterpillar stitch
- Chinese wave stitch
- double fleck stitch
These patterns may require a bit more focus, but they’re well worth the effort! The mesh stitch is another eye-catching option, resulting in a delicate, open fabric suitable for light and airy projects.
And don’t forget the classic cable stitch, loved for its intricate and timeless beauty.
I encourage you to continue discovering new stitch textures and patterns to add to your knitting repertoire.
With each new stitch learned, you’ll gain valuable experience and have the opportunity to create beautiful, unique pieces. Happy knitting!
Advanced Knitting Stitches
As I continue to explore the world of knitting, I’ve come across some advanced stitches that offer more intricate patterns and textures.
These stitches may be a bit more challenging, but they are certainly rewarding to learn.
In this section, I’ll be discussing a variety of advanced knitting stitches that can help you elevate your knitting game.
One interesting stitch I’ve learned is the Bamboo Stitch. This stitch creates a pattern that resembles bamboo shoots, making it perfect for projects with a nature-themed design.
It consists of alternating yarnovers and purl stitches in a repeated pattern.
I’ve also tried the Basketweave Stitch, which imitates the woven look of a basket. The pattern is created by alternating blocks of knit and purl stitches, making it a great choice for those who enjoy working with textured stitches.
The Andalusian Stitch is another unique stitch that caught my eye. This stitch involves a simple four-row repeat, alternating between knit and purl rows. It creates a subtle texture that is both elegant and easy to work with.
Another eye-catching stitch is the Raspberry Stitch, also known as the Trinity Stitch. This stitch creates small, textured “bumps” that resemble raspberries. It’s a beautiful choice for adding a touch of sophistication to your projects.
The Seersucker Stitch is a fun textured stitch that creates a puckered fabric, much like the fabric it’s named after. It’s achieved by knitting and purling into the same stitch, creating a unique pattern as you work through your project.
A stitch that has become one of my favorites is the Caterpillar Stitch. This stitch consists of slipped stitches and yarnovers, creating a zigzagging, caterpillar-like pattern across the fabric.
For those who love working with multiple colors, the Double Fleck Stitch is a great option. This stitch creates a beautiful, speckled pattern that is perfect for adding some visual interest to your projects.
Another interesting stitch is the Diamond Honeycomb Stitch. This stitch creates a three-dimensional diamond pattern reminiscent of honeycombs. It’s perfect for adding a touch of sophistication to any project.
Lastly, the Netted Stitch is an advanced stitch that gives a delicate, net-like appearance to your work.
This stitch involves casting on extra stitches and then incorporating them into your project, making it a fantastic choice for adding a unique texture to your knitting repertoire.
In conclusion, these advanced knitting stitches open up a world of possibilities for creating more intricate and textured projects.
As I continue to expand my knitting skills, it’s wonderful to discover these fascinating stitches and use them to enhance my work.
Learning Resources
I’ve discovered a variety of resources that are helpful in learning about knitting patterns and the different types of stitches involved.
Here, I will share a few of my favorites to help you get started on your knitting journey.
One of my go-to resources is video tutorials. There are tons of YouTube channels and other websites dedicated to teaching knitting techniques.
I found that watching someone else perform the stitches and explain their methodology made it easier for me to grasp the concepts.
In particular, I love using video tutorials to learn new stitch patterns for projects like washcloths.
In addition to video tutorials, written instructions can be a great learning tool. Many knitting websites and blogs offer detailed, step-by-step instructions for various stitches and patterns.
These resources often include helpful images to illustrate the process more clearly. I like to print out instructions and keep them in a knitting binder with my other patterns so I can easily refer back to them when needed.
One thing I learned early on as a knitter is the importance of swatching.
Creating a swatch (essentially a small sample square) of a stitch pattern helps me understand how the stitches work together and allows me to practice new techniques before diving into a larger project.
Plus, swatching helps with determining the correct gauge, and making sure that my finished project will be the right size.
Here are some learning resources that I find most helpful:
- Video tutorials: There are numerous YouTube channels, such as VeryPink Knits and KnitFreedom, that offer a wide variety of instructional videos for all skill levels. Videos allow me to see each step in action and easily follow along.
- Written instructions: Websites like KnittingHelp and Purl Soho offer many knitting tutorials and patterns with clear instructions and images. They are excellent resources to refer back to while working on a project.
- Swatching: As a beginner knitter, practicing stitches on a small swatch can be incredibly valuable. It gives me the opportunity to practice new techniques, check my gauge, and ultimately improve my knitting skills.
These resources have provided me with a solid foundation to expand my skills and knowledge of knitting patterns and stitches.
By using them, I feel more confident in tackling new and exciting projects. Happy knitting!
Alan’s Tips and Tricks
Hi there! As a knitting enthusiast, I’d like to share some tips and tricks to help fellow knitters with their projects.
Learning different types of stitches is a fun and essential part of knitting.
First off, mastering the basic knit and purl stitches is the foundation of any knitting project. These two stitches create different textures and patterns.
Combining knit and purl stitches will help you produce various beginner knitting stitches full of different textures.
Knit stitch: To create the knit stitch, simply insert the right needle into the first stitch on the left needle, from left to right. Wrap the yarn around the right needle and pull it through to create a new stitch. Once you’ve mastered the knit stitch, you can create ridges and different textures in your project.
Purl stitch: The purl stitch is the reverse of the knit stitch. Start by inserting the right needle into the first stitch on the left needle, from right to left. Wrap the yarn around the right needle and pull it through, creating the new stitch. Practicing the purl stitch will allow you to create a variety of purl ridges and textures, adding depth and interest to your knitting projects.
In addition to knit and purl, there are many other stitches you can explore to add flair to your knitting projects.
Some beginner-friendly stitches that I recommend trying include:
- Garter stitch (knit every row)
- Stockinette stitch (alternate between knit and purl rows)
- Seed stitch (alternate between knit and purl stitches within the same row)
When learning new stitches, don’t be afraid to experiment. Free stitch guides are available online, and I encourage you to try them out.
Keep practicing, and you’ll soon be able to create a wide variety of textures and patterns in your knitting.
Remember, knitting is a journey.
Enjoy the process, and don’t forget to have fun along the way! Happy knitting!
Frequently Asked Questions
What are the essential stitches for beginners?
As a beginner, I found it helpful to start with two basic stitches: the knit stitch and the purl stitch.
Practice these stitches individually, and then combine them in different ways to create interesting patterns.
Garter stitch and stockinette stitch are great patterns for beginners as they only use knit and purl stitches, respectively.
How to distinguish between knit and purl stitches?
When examining my knitting, I can distinguish knit stitches as they create a “V” shape, while purl stitches create horizontal bumps.
In a knit stitch, the working yarn is held at the back of the needle, whereas, in a purl stitch, the working yarn is held in front.
By remembering these visual and positional differences, I can easily identify the stitches and follow patterns.
What is the difference between seed and moss stitches?
Both seed and moss stitches involve alternating knit and purl stitches, but they differ in their sequence.
In a seed stitch pattern, I alternate knit and purl stitches in every row. In a moss stitch, I alternate knitting and purling for two rows before switching the sequence.
Though the two stitches have similar appearances, the moss stitch creates a denser fabric with a slightly different texture.
Can you recommend some unique knitting patterns for advanced learners?
As I advanced in my knitting, I enjoyed trying out more complex patterns, such as cables, lace, and entrelac.
Cable patterns involve crossing stitches over each other to create intricate twists, while lace knitting uses yarn overs and decreases to form delicate, openwork patterns.
Entrelac knitting creates a textured, interwoven pattern by working with a series of interconnected rectangles.
These advanced patterns can add a new level of creativity and challenge to any knitting project.
What are some resources for enhancing knitting pattern knowledge?
To expand my knitting pattern knowledge, I explored books, online tutorials, and video courses available on various platforms like YouTube, Ravelry, and knitting blogs.
In addition, I connected with other knitters through social media groups and local knitting clubs, where we shared tips, techniques, and patterns to enhance our skills.
How many types of knitting styles exist, and how do they differ?
There are several knitting styles that I have encountered, with the most common being English, Continental, and Combined knitting.
In English style, I hold the working yarn in my right hand and “throw” it around the needle to create stitches.
In Continental style, I hold the working yarn in my left hand and “pick” the yarn with my needle.
Combined knitting involves a mix of English and Continental methods, with the yarn being held in the left hand and stitches formed differently.
Each style has its own advantages and preferences, depending on factors like knitting speed, tension, and comfort.


